Usability and Mobile Application II
Wu Xin Ying
0328708
April 2018 - July 2018
Usability and Mobile Application II
Module Outline
Week 1
For the first week of the module, Mr Razif and Mr Kannan gave us an introduction and briefing on this module. They brief and explain to us on our project and exercises that we need to done throughout the whole semester. After the briefing, we showed our final project of Usability & Mobile Application 1 that we did last semester to Mr Kannan. After showing to Mr Kannan, he said that the button and words are too big and need to be smaller. He also said that I need to readjust the spacing and consistency of the layout. He also suggested me to specify whether the apps is Android or Mac so that it will be convenient for user as some user may not familiar with certain operating system. Moreover, Mr Kannan also told me to remove some of the unnecessary features and make the app simple and easier to use.
For the first tutorial of the module, Mr Razif told us to prepare our file and bring us to other's class to carry out the usability testing of our final project of Usability & Mobile App 1. Mr Razif told us that before the usability test, we have to give a task to the user and observe whether they can finish the task successfully. He also told us that we cannot interrupt the user during the usability test. Mr Razif told us to record the process of usability test and get the feedback from the user.
After the usability testing, Mr Razif told us to record the feedback in the Real Time Board. He brief and teach us on how to key in the feedback in Real Time Board.
Week 2
Class cancelled. Focus on RMIT Collaboration class.
Week 3
Class cancelled. Focus on RMIT Collaboration class.
Week 4
For this week, Mr. Razif gave us an introduction to JQuery mobile and Setting up in Phone Gap. First, he asked us to download Phone Gap in our laptop and open it. Before we create the PhoneGap Project, we have to create a file that able to locate the project file. After created the PhoneGap Project in PhoneGap, he asked us to open a new site in Adobe Dreamweaver and locate it in "www" file. After that, Mr Razif taught us to create a page and link them together.
At first, I was very confused and the code was unworkable. After a few attempts, it was finally worked. After that, Mr Razif also taught us the way to create and link the button.
Week 5
I chose the second idea which is the Pets Care/ Adopt App. After the proposal have been approved by Mr. Kannan, I started to create the flow chart and screen design for this app.
For the tutorial, Mr Razif taught us to design and arrange the layout of the app. He gave us an exercise which we need to code one page with layout. Since I haven't started the new design for my new app, I used the first page of my app design last semester in this coding exercise.
This is the link of PhoneGap file in google drive:
https://drive.google.com/drive/folders/1HdhkDGFe5hrUz_rQaimztJ_ixCdqTZh2?usp=sharing
0328708
April 2018 - July 2018
Usability and Mobile Application II
Module Outline
Week 1
For the first week of the module, Mr Razif and Mr Kannan gave us an introduction and briefing on this module. They brief and explain to us on our project and exercises that we need to done throughout the whole semester. After the briefing, we showed our final project of Usability & Mobile Application 1 that we did last semester to Mr Kannan. After showing to Mr Kannan, he said that the button and words are too big and need to be smaller. He also said that I need to readjust the spacing and consistency of the layout. He also suggested me to specify whether the apps is Android or Mac so that it will be convenient for user as some user may not familiar with certain operating system. Moreover, Mr Kannan also told me to remove some of the unnecessary features and make the app simple and easier to use.
For the first tutorial of the module, Mr Razif told us to prepare our file and bring us to other's class to carry out the usability testing of our final project of Usability & Mobile App 1. Mr Razif told us that before the usability test, we have to give a task to the user and observe whether they can finish the task successfully. He also told us that we cannot interrupt the user during the usability test. Mr Razif told us to record the process of usability test and get the feedback from the user.
After the usability testing, Mr Razif told us to record the feedback in the Real Time Board. He brief and teach us on how to key in the feedback in Real Time Board.
Week 2
Class cancelled. Focus on RMIT Collaboration class.
Week 3
Class cancelled. Focus on RMIT Collaboration class.
Week 4
For this week, Mr. Razif gave us an introduction to JQuery mobile and Setting up in Phone Gap. First, he asked us to download Phone Gap in our laptop and open it. Before we create the PhoneGap Project, we have to create a file that able to locate the project file. After created the PhoneGap Project in PhoneGap, he asked us to open a new site in Adobe Dreamweaver and locate it in "www" file. After that, Mr Razif taught us to create a page and link them together.
 |
| My coding for the first page |
At first, I was very confused and the code was unworkable. After a few attempts, it was finally worked. After that, Mr Razif also taught us the way to create and link the button.
 |
| Coding for Buttons |
Week 5
For this week, Mr Kannan and Mr Razif asked us to finalize our design for Mobile Application II. Students can choose whether use the app design created last semester or use the same topic but different design or change the whole topic and design. For me, I decided to change my whole topic and design as I'm not satify with my app design for last semester. The PDF below is my new App Proposal:
I chose the second idea which is the Pets Care/ Adopt App. After the proposal have been approved by Mr. Kannan, I started to create the flow chart and screen design for this app.
For the tutorial, Mr Razif taught us to design and arrange the layout of the app. He gave us an exercise which we need to code one page with layout. Since I haven't started the new design for my new app, I used the first page of my app design last semester in this coding exercise.
 |
| My first page |
https://drive.google.com/drive/folders/1HdhkDGFe5hrUz_rQaimztJ_ixCdqTZh2?usp=sharing
Week 6
This week, I started to create the flow chart for my new app. The image beloew is my flow chart for my new app.
After finished my flow chart, I started to search for reference and design. First, I designed the logo for the App. The name of my app is iPet. The reason is that iPet have the same pronounce as iPad which is a digital gadget. Thus, iPet means a digital gadget that contains information about pets. The image below are the logos:
About the logo, I decided to use the "apple" from the brand Apple which brings out the feeling of "digital". In order to let the user know that the app was an app about pet, I decided to illustrate a dog, which indicates pet. The main color fo this app is #D49D80 and the font that I chose was Avenir Next LT Pro.
 |
| Flow Chart for my new app |
 |
| Logo |
 |
| Logo with app name |
 |
| Logo in offwhite |
Week 7
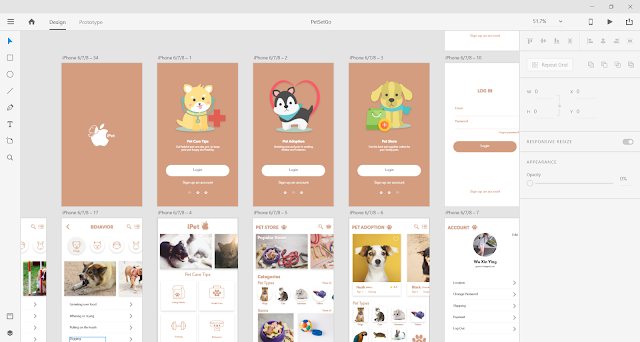
On this week, I finished my app design and I showed it to Mr.Kannan and Mr.Razif for comments. Mr. Kannan commented that the design is there just that need to do some changes or adjustment on the color contrast. He said that the color doesn't pop out and they look blending together. For Mr. Razif, he commented that the alignment of my app is a bit off. He told me to do some adjustment on the layout and alignment. Moreover, some of the text is too big and need to be smaller. He also commented that some of the images in the app are not consistent. The unnecessary spaces need to be eliminated as well.
 |
| App design in Adobe XD |
Week 8
After getting the feedback from Mr. Kannan and Mr. Razif, I did the changes and adjustment according to their comments. Before the submission, I have done some polishing on my app design and finalize the design.
Link of the Screen Design in Adobe XD in google drive:
https://drive.google.com/open?id=1yiBNKtTFKfg0s6crIav9vs5wRRutKfDd
Link of the Screen Design in Adobe XD in google drive:
https://drive.google.com/open?id=1yiBNKtTFKfg0s6crIav9vs5wRRutKfDd
Week 9- 14
After finalized the app design, I started the coding on Adobe Dreamweaver. Throughout the process of coding, I faced a lot of problems with the coding and lack of time. First of all, I'm stuck with the problem of the image button as I'm not able to link it to another page. I tried to find tutorials and solution online and finally the problem has been solved. I solved it with adding the code <a href="" data-role="link"> in front of the image code and end up with </a>.
Moreover, I also struggle with the background color of the page. I tried a lot of ways from online and tutorials but it doesn't work at all. The most challenging part in this coding process is the layout. When I started to code, the layout was very messy and the containers were overlying on each other. I tried to separate everything in different div but, the layout gets better and nicer but some of the div still cannot align well.
Although there was a lot of issues in the coding process, however, I tried my best and get a lot of help from my lecturers, friends and online tutorials. I have learned from mistakes and understood more about coding in the coding process. Due to the insufficient time and lots of assignment due, I have not able to finish the coding on time and I feel very grateful and appreciated that Mr. Razif has extended the dateline for the submission.
Link of final submission in google drive:
https://drive.google.com/drive/folders/1H_fCKHH7a9IR_eVpA75JR1aPsxVEyQ0D?usp=sharing
After finalized the app design, I started the coding on Adobe Dreamweaver. Throughout the process of coding, I faced a lot of problems with the coding and lack of time. First of all, I'm stuck with the problem of the image button as I'm not able to link it to another page. I tried to find tutorials and solution online and finally the problem has been solved. I solved it with adding the code <a href="" data-role="link"> in front of the image code and end up with </a>.
| Coding for the image button |
 |
| Coding for my app |
 |
| Login page of my app |
Link of final submission in google drive:
https://drive.google.com/drive/folders/1H_fCKHH7a9IR_eVpA75JR1aPsxVEyQ0D?usp=sharing


Comments
Post a Comment